¶ SONIA - PFE H2021
(Work In Progress)
Telemetry app for the web, using React and Typescript, roslibjs.
¶ Overview
During the winter of semester of 2020, three software engineering students (Anthony Frezzato, Hervé Carol Marorerwa, Laurent Boisvert) have accepted the mandate to remake the telemetry. The club have already a telemetry based on RQT under python but the encounter several problem because they are really dependent of packages. They would like to create a web telemetry which is independent of the module architecture using ROSLIB.
¶ The project
¶ Problems
The current telemetry is based on RQT and directly ROS packages made by the club. This create a strong coupling between the telemetry and the ROS packages. RQT is a software framework of ROS that implements the various GUI tools in the form of plugins, but they have some problem of portability. Currently the club is using mostly the telemetry on Ubuntu that is a GNU / Linux operating system based on the Debian Linux distribution.
¶ Requirement
The club provided some requirement to the developpement teams:
- Documenting the code
- Project documentation in WikiJS (Explanation of the modules and how telemetry works)
- Respect for the git-flow established by SONIA members.
- Make sure to develop telemetry that will be easily maintainable by future club members.
- Make sure the telemetry is working for both submarines.
- Ensure the modularity of telemetry.
¶ Features
Here a list of features requested by the club by priority order:
¶ Dry test
- Thruster Control (SONIA)
- Actuator (SONIA)
- Dvl (SONIA) - need to be confirmed
- Power (SONIA)
- Test Board (SONIA)
¶ Toolbar
- Mission et kill switch.
- Activation of motors
- Camera launcher
- Batteries
¶ Telemetry
- Image view (RQT) for Viewing cameras
- Vision UI (SONIA) Deep learning and vision filters.
- Waypoint (SONIA) Primary flight display (PFD) style and separated control
- MissionManager (SONIA) for choosing a mission
- Depth Indicator (SONIA) (Integrated inside the PFD)
- Navigation map (SONIA) (Integrated inside the PFD)
- Thruster Effort and Control (SONIA)
- Dynamic Reconfigure (RQT)
- MatPlot (RQT)
- Hydro emulation (SONIA)
- Console (SONIA)
- Manual Vision (SONIA)
- Vision simulation (SONIA)
- Service caller (RQT)
- Topic Monitor (RQT)
- Manage bags (RQT)
¶ Solution
With all this in mind, the solution adopted is:
- Use React with Typescript to ensure portability of the code.
- Use ROSLib JS to remove the coupling between ROS modules and the telemetry.
- Use Sonia Wiki for the documentation of the project.
- Use Sonia github to host the code and track issues.
- Create layout system that support module integration.
- Use Docker to run the telemetry
- Create a modular architecture to ensure modularity and maintainability
¶ Basic developper test setup
The telemetry can be runned locally but every module need to receive data from ROS.
In order to simulate data you can use a BAG. A bag is a file format in ROS for storing ROS message data.
The club provided bags to the team and have team to replay live situation.
¶ Setup
In order to run a bag you need to install the following component from ROS:
- ROS Melodic : http://wiki.ros.org/melodic/Installation/Ubuntu
- ROS Bridge : http://wiki.ros.org/rosbridge_suite/Tutorials/RunningRosbridge
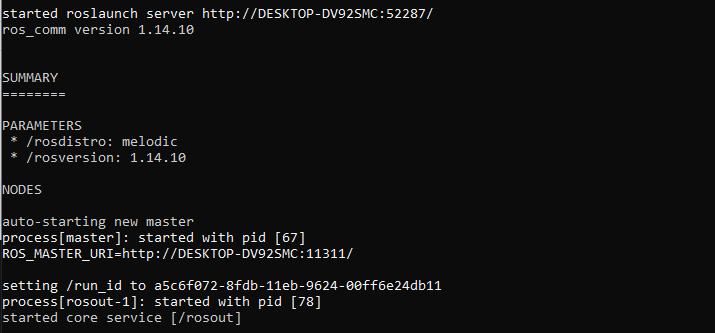
¶ Run bag
In order to run a bag, you need three terminal:
¶ Terminal 1
- Open first terminal and type the two following commands :
- source /opt/ros/melodic/setup.bash
- roscore
The result should be something like:
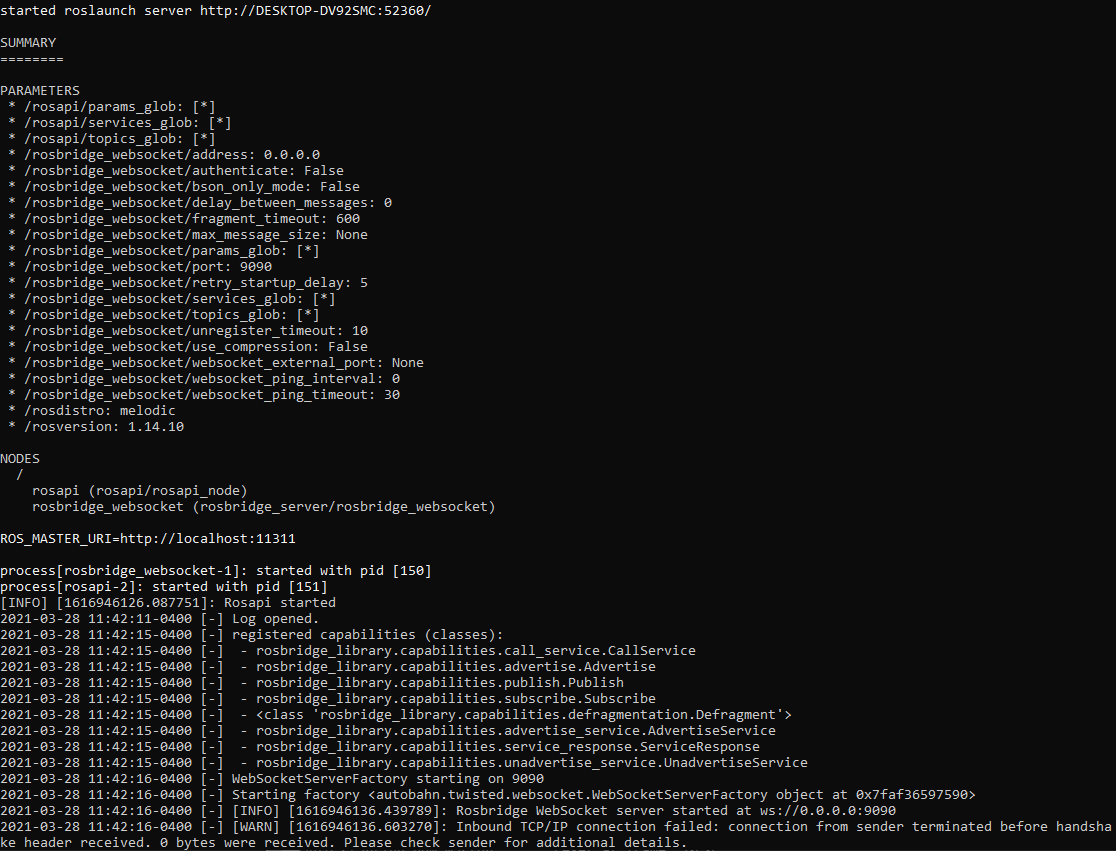
¶ Terminal 2
- Open second terminal and type the two following commands :
- source /opt/ros/melodic/setup.bash
- roslaunch rosbridge_server rosbridge_websocket.launch
The result should be something like:
¶ Terminal 3
- Open third terminal, use ls command to browse to proper folder and run the command :
- rosbag play filename
¶ Project architecture

¶ ROSLib
The Robot Operating System (ROS) is a set of software libraries and tools that help you build robot applications.
The telemetry have to communicate with the ROS bridge in order to display or send informations. ROS provide a library called ROSLIB javascript (s) and this is the core JavaScript library for interacting with ROS from the browser. It uses WebSockets to connect with rosbridge and provides publishing, subscribing, service calls.
On our end we implemented three function:
- Subscribe to a topic
- Publish a topic
- Service request
¶ Subscribe to a topic
Here a sample of code how to suscribe to a ros topic:
useROSTopicSubscriber<any>(thrusterEffortCallback, "/provider_thruster/effort", "sonia_common/ThrusterEffort")
In this example we provide a callback function. This function will be called at every update of the data topic subscribe.
The second parameter is the name of the topic and the third parameter is the type of the message (here sonia_common/ThrusterEffort is a custom message type by SONIA).
The callback function receive the data inside the variable x, aftermath the UI is updating components depending the new value:
const thrusterEffortCallback = useCallback( (x: any) => { ...do something here... }, [] )
¶ Publish to a topic
Here a sample of code how to publish to a ros topic
Declaration (once):
const testBoardPublisher = useROSTopicPublisher<any>("/interface_rs485/dataRx", "sonia_common/SendRS485Msg")
Usage (can be called on demand with different parameters):
testBoardPublisher({slave: slave, cmd: cmd, data: data})
In this example we provide again the name of the topic and the type of the message (here sonia_common/SendRS485Msg is a custom message type by SONIA). testBoardPublisher has to be declared once and it can be used multiple of times with different values. The field (slave, cmd and data) depends of the service definition refers to "sonia_common\msg" to see the definition of a specific message.
¶ Request a service
Here a sample of code how to request a ros service
Declaration (once):
const getFilterChainFromExecutionServiceCall = useROSService<any>(getFilterChainFromExecutionCallback, "/proc_image_processing/get_media_from_execution", "sonia_common/GetMediaFromExecution");
In this example we provide a callback function. This function will be called on response of the service call. The second parameters is the name of the service, the third parameter is the type of the service.
The callback function receive the data inside the variable x, aftermath the UI is updating components depending the new value:
const getFilterChainFromExecutionCallback = useCallback( (x: any) => { ...do something here... }, [] )
Usage (can be called on demand with different parameters):
var request = ServiceRequestFactory({ exec_name: x.target.value });
getFilterChainFromExecutionServiceCall(request)
In this usage example we create a request and the fields (exec_name) depends of the service definition, refer to "sonia_common\srv" to see the definition of a specific message.
¶ Material UI
Material-UI is an open-source project that features React components that implement Google's Material Design.
In the telemetry we used mostly this library to design the UI components.
Here the list of major components used from Material UI and the corresponding documentation:
- Button (https://material-ui.com/components/buttons/)

- Select (https://material-ui.com/components/selects/)
- Menu (https://material-ui.com/components/menus/)
- Textfield (https://material-ui.com/components/text-fields/)

- Checkbox (https://material-ui.com/components/checkboxes/)

- Grid (https://material-ui.com/components/grid/)
- AppBar (https://material-ui.com/components/app-bar/)

- Tabs (https://material-ui.com/components/tabs/)
- List (https://material-ui.com/components/lists/)
- Slider (https://material-ui.com/components/slider/)
¶ Modules
In this section the module we describe the modules implemented during the PFE
¶ Thrusters
The truster module allow to control the motors of the submarine during a dry test.
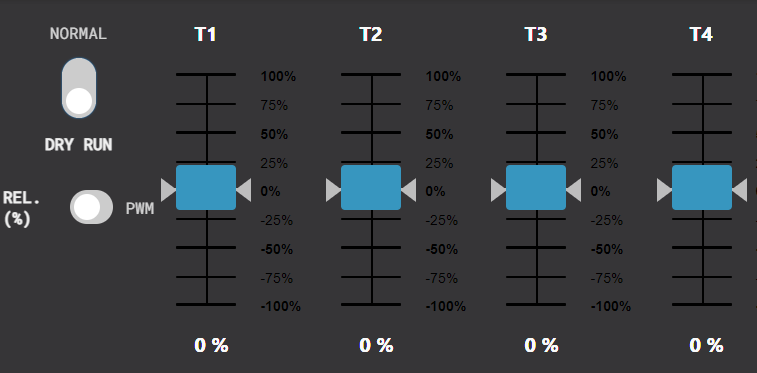
Characteristics:
- In normal mode the user cannot move the slider and the user have to switch in dry run mode in order to be able to change values.
- The PWM mode is not implemented and will be used in the futur, for now the command are send in percentage.
- The motor feedback is given by the two gray arrow, also the feedback value is displayed at bottom of the slider.
¶ Topics, services used
- Read thruster effort values: Topic name:
/provider_thruster/effort, Message type:sonia_common/ThrusterEffort - Change thruster control values: Topic name:
/provider_thruster/thruster_effort, Message type:std_msgs/String
¶ Actuators
The actuator module allow to activate actuators on the submarine.
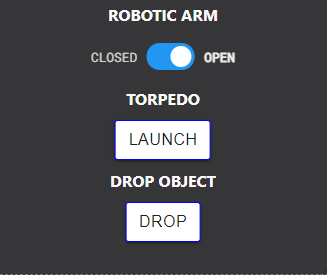
Characteristics:
- The robotic arm can be opened or close with the switch.
- The torpedo can be launched with "LAUNCH" button.
- The button "DROP" allow to drop the object from the submarine.
¶ Topics, services used
- Activation of an actuator: Service name:
/provider_actuators/do_action_srv, Service type:sonia_common/ActuatorDoActionSrv
¶ ImageViewer
The camera viewer allow to see camera video stream. Uncompressed and compressed format are supported.
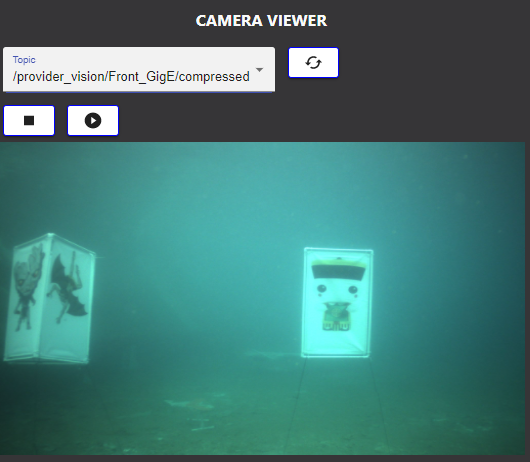
Characteristics:
- Click on refresh button to see the list of topics available for video stream. Note that only ["sensor_msgs/CompressedImage", "sensor_msgs/Image"] video type will be displayed on the list.
- When a topic is selected then video stream is displayed.
- Press the stop button unsuscribe to the video stream.
- Press the play button to re-suscribe to the current topic selected on the list.
¶ Topics, services used
- Topics listing: Service name:
/rosapi/topics/, Service type:/rosapi/topics/ - Read a compressed video stream: Topic name:
/provider_vision/Front_GigE/compressedor/provider_vision/Bottom_GigE/compressed, Message type:sensor_msgs/CompressedImage - Read a uncompressed video stream: Topic name:
/provider_vision/Front_GigEor/provider_vision/Bottom_GigE, Message type:sensor_msgs/Image
¶ ToolBar
The toolbar is made up of buttons that allow the user to send ROS commands

characteristics:
- The menu button: This button is used to reset a layout and to switch from a theme to another (dark/light).
- All: It is used to activate the XY axis, the depth, the roll, the pitch and the yaw.
- XY: It activates the XY axis.
- DEPTH: It activates the Z axis.
- Roll: It activates the roll.
- YAW: It activates the yaw.
- Start Front: It activates the front camera.
- Start Bottom: It activates the bottom camera.
- AUV7 and AUV8 indicates the temperature of AUV7 and AUV8
- There are also 2 battery level indicators
- The mission switch button is a state indicator for the mission switch
- The kill switch button is a state indicator for the kill switch
¶ Topics, services used
- Activation of an axis: Service name:
proc_control/EnableControl, Service type:sonia_common/EnableControl - Starting and stopping a camera: Service name:
/provider_vision/StarStopCamera, Service type:sonia_common/StartStopMedia - Batterry levels: Topic name:
/provider_power/power, message type:sonia_common/PowerMsg - Mission switch state : Topic name:
/provider_kill_mission/mission_switch_msg, message type:sonia_common/MissionSwitchMsg - Kill switch state : Topic name:
/provider_kill_mission/kill_switch_msg, message type:sonia_common/KillSwitchMsg - System temperatures: Topic name:
/provider_jetson/system_temperature, message type:std_msgs/Float32
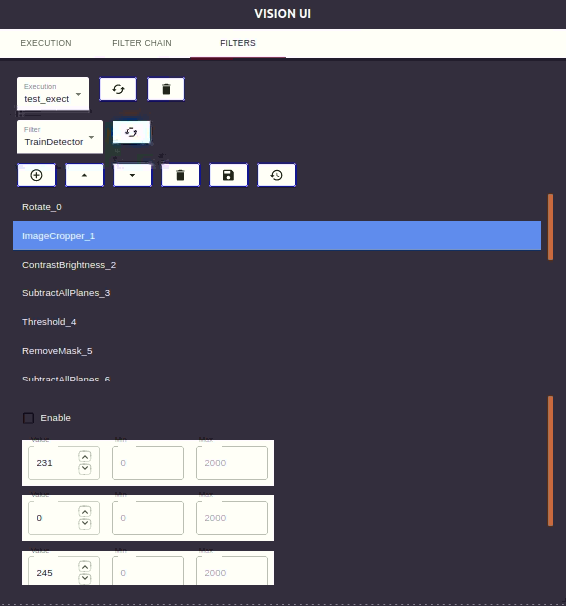
¶ VisionUI
The vision UI allow to apply image filter on the submarine camera. The vision UI is able to create and edit a chain of filters.
In order to see result, the image viewer can be used.
Characteristics:
¶ Execution tab
- The execution tab allows to create an execution of a filter chain on a media. In order to create a new execution, enter a name and select the filter chain that you want to apply and select the media that you want to apply the chain. Click create to start the new execution.
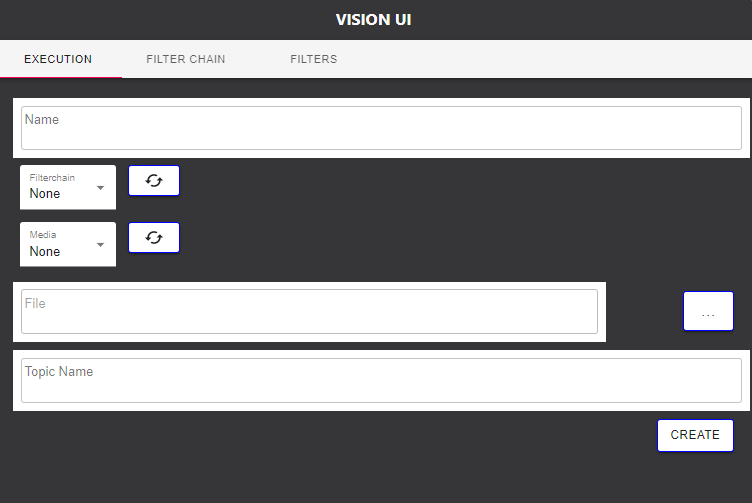
¶ Topics, services used
- Start a media: Service name:
/provider_vision/start_stop_camera, Service type:sonia_common/StartStopMedia - Execute a command: Service name:
/proc_image_processing/execute_cmd, Service type:sonia_common/ExecuteCmd - Retrieve filter chain list: Service name:
/proc_image_processing/get_information_list, Service type:sonia_common/GetInformationList - Retrieve the media list: Service name:
/proc_image_processing/get_information_list, Service type:sonia_common/GetInformationList
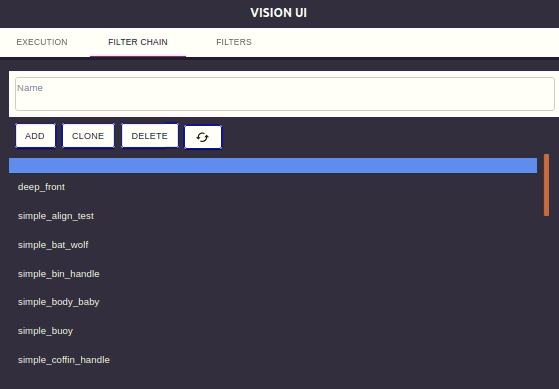
¶ Filter chain tab
- The filter chain tabs allows you to create new emply filter chain, clone an existing filter chain or delete existing one. Please enter a name if you add a new one or if you clone an existing one.
¶ Topics, services used
- Add a filter chain: Service name:
/proc_image_processing/manage_filterchain, Service type:sonia_common/ManageFilterchain - Retrieve filter chain list: Service name:
/proc_image_processing/get_information_list, Service type:sonia_common/GetInformationList - Copy a filter chain: Service name:
/proc_image_processing/copy_filterchain, Service type:sonia_common/CopyFilterchain - Delete a filter chain: Service name:
/proc_image_processing/manage_filterchain, Service type:sonia_common/ManageFilterchain
¶ Filter tab
- The filters tabs allows you to manage a filter chain on a execution. First select the execution in order to retrieve the filter chain. You can also delete an execution in this tabs. After you have selected a execution, the list of filters applied by ascending order (the filter chain).
- The filter list represent all available filter that can be added in the chain. Update first the list and then press (+) button to insert it in the chain.
- The Up/Down arrows allow to change the order of application of a filter in the chain.
- The delete button allow to delete a filter for the chain.
- The save button save the filter chain and the restore button allow you to revert changes to last saving state of a filter chain.
- When selecting a filter in the filter chain list all parameters for the filter are displayed and the setting can be changed. When changing a parameter the change is live applied.
¶ Topics, services used
- Retrieve execution filter chain list: Service name:
/proc_image_processing/get_filterchain_filter, Service type:sonia_common/GetFilterchainFilter - Get the filter chain from execution: Service name:
/proc_image_processing/get_media_from_execution, Service type:sonia_common/GetMediaFromExecution - Retrieve execution list: Service name:
/proc_image_processing/get_information_list, Service type:sonia_common/GetInformationList - Delete an execution: Service name:
/proc_image_processing/execute_cmd, Service type:sonia_common/ExecuteCmd - Retrieve all filter chain list: Service name:
/proc_image_processing/get_information_list, Service type:sonia_common/GetInformationList - Add or delete filter: Service name:
/proc_image_processing/manage_filterchain_filter, Service type:sonia_common/ManageFilterchain - Save filter: Service name:
/proc_image_processing/save_filterchain, Service type:sonia_common/SaveFilterchain - Change order of a filter: Service name:
/proc_image_processing/set_filterchain_filter_order, Service type:sonia_common/SetFilterchainFilterOrder - Observe a filter: Service name:
/proc_image_processing/set_filterchain_filter_observer, Service type:sonia_common/SetFilterchainFilterObserver - Retrieve all parameter for a filter: Service name:
/proc_image_processing/get_filterchain_filter_all_param, Service type:sonia_common/GetFilterchainFilterAllParam - Change a parameter for a filter: Service name:
/proc_image_processing/set_filterchain_filter_param, Service type:sonia_common/SetFilterchainFilterParam
¶ Waypoint (commands)
The waypoint module allow to control the position and the speed of the submarine
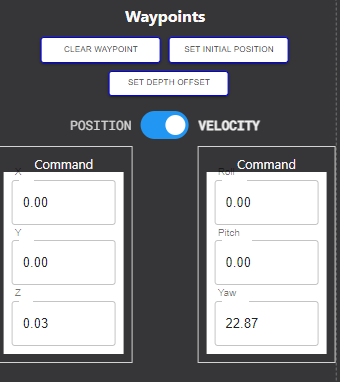
Characteristics:
- The clear waypoints button reset the path taken by the submarine (note that the waypoints are not visible, see remain to be done section).
- The "Set initial position" button set the current position as reference. The position commands are relative to the initial position.
- The "Set depth offset" button set the level 0 position. The Z position commands are relative to 0 deepness.
- The switch allow to be in position mode or in velocity mode. In position mode, all values (X,Y,Z,Roll,Pitch and YAW) are position command. In velocity mode, all values (X,Y,Z,Roll,Pitch and YAW) are velocity command. The commands are sent only when pressing "Enter".
- If a field is null or invalid, when pressing Enter, the last valid command is send to submarine for the corresponding field.
¶ Topics, services used
- Change the control mode: Service name:
/proc_control/set_control_mode, Service type:sonia_common/SetControlMode - Clear waypoints: Service name:
/proc_control/clear_waypoint, Service type:sonia_common/ClearWaypoint - Set initial position: Service name:
/proc_navigation/set_world_x_y_offset, Service type:sonia_common/SetWorldXYOffset - Set depth offset: Service name:
/proc_navigation/set_depth_offset, Service type:sonia_common/SetDepthOffset - Send positions: Service name:
/proc_control/set_global_target, Service type:sonia_common/SetPositionTarget - Read the control mode: Topic name:
/proc_control/control_mode, Message type:std_msgs/UInt8 - Read the current target position: Topic name:
/proc_control/control_mode, Message type:geometry_msgs/Pose - Read the current target velocity: Topic name:
/proc_control/current_target_velocity, Message type:geometry_msgs/Twist
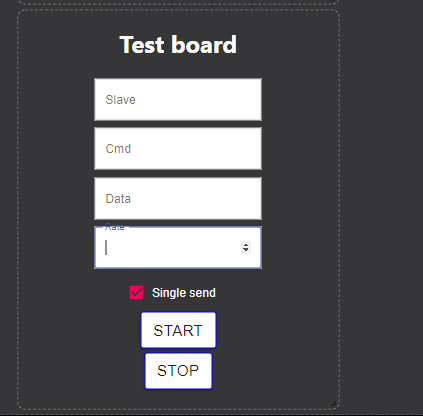
¶ Testboard
The testboard modules contains a form of with 4 inputs: CMD, Slave, Data and rate. On the submit of the form, the data that is sent is formed of the 3 inputs CMD, Slave and Data. The rate input in used when the user wants to send the data continuously. If the single send checkbox is checked, the data will be sent only once to ROS. If the single send checkbox is not checked, the data will be sent continuously at the rate defined in the rate input.
¶ Topics, services used
- Publish values from the form: Topic name:
/interface_rs485/dataRx, message type:sonia_common/SendRS485Msg
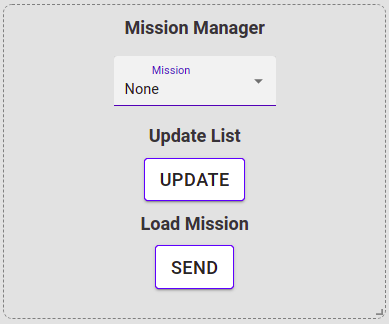
¶ Mission Manager
The misssion manager is used to select a mission and load it on the submarine. This module is necessary for the competition because it allows us to select a mission before disconnecting the cable between the dockbox and the AUV. To refresh the missions list, you simply have to press the "Update" button. Select the mission and press "Send" to load the mission on the submarine. Here's what the module looks like.
¶ Topics, services used
- Send the mission name to the AUV: Topic name:
/mission_manager/mission_name_msg, message type:/mission_manager/MissionNameMsg(Will be updated soon) - Get the missions list: Service name:
/mission_executor/list_missions, Service type:ListMissions(Will be updated soon)
¶ Primary Flight Display
The PFD allow to see the different position/angles of the submarine.
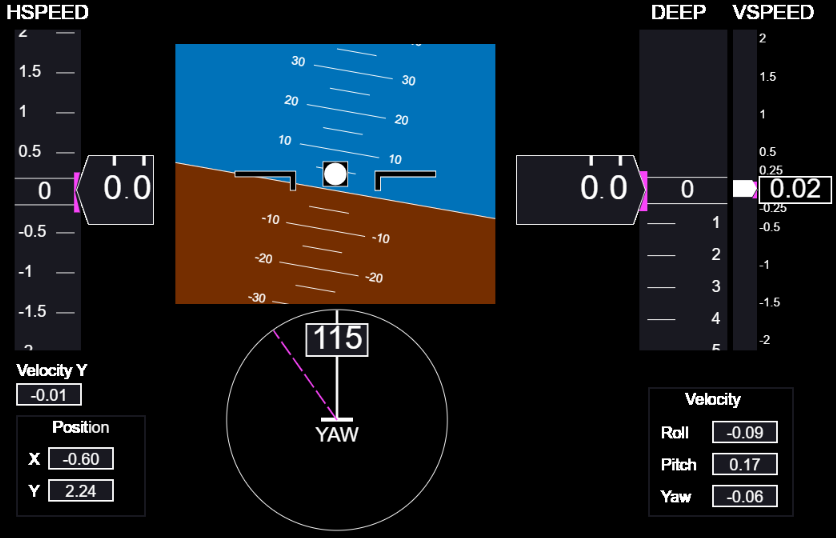
Characteristics:
- HSPEED is the horizontal speed, the speed is the facing direction of submarine (airspeed for aircraft). The bug speed in magenta is the current target for horizontal speed (or X velocity).
- The PICH and ROLL angle are displayed in the attitude display
- The current YAW angle is displayed in white and the magenta color is the target YAW.
- VSPEED is the vertical speed or Z velocity. The speed bug in magenta is the current target for Z velocity.
- DEEP is the deep of the submarine (or Z position). The bug in magenta is the current deep target position (or Z target position).
¶ Topics, services used
- Read odometry values: Service name:
/proc_navigation/odom, Service type:nav_msgs/Odometry - Read current target position values: Service name:
/proc_control/current_target, Service type:geometry_msgs/Pose - Read current target velocity values: Service name:
/proc_control/current_target_velocity, Service type:geometry_msgs/Twist
¶ Side Bar
The side bar contains the ModulePicker component, which allows the user to pick which modules are to be displayed - or active - in the application.
 These settings are remembered across sessions through
 LocalStorage.
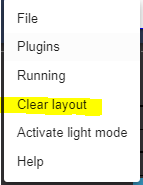
¶ Layout Manager
The current layout just save the position of all modules. If the telemetry is close and re-open all modules remains at the same place.
In order to reset the layout and return to an initial setup, please go to "Menu" on top left and click on "Clear Layout"
¶ Control Module
This module allows the users to have visual returns on the different components of the AUV (sensors, DVL, MPC, etc.). It is also possible to create a trajectory for the submarine based on the selected mode.

¶ Control Module
- MPC ACTIVE
- Inactive
- Active
- MPC STATUS
- Red: Anything else where Data != 0,1 or 2.
- Orange: Data = 0
- Green: Data = 1 or 2
- SENSOR ON
- Off
- On
¶ Target
- REACHED
- Not Reached
- Reached
¶ Modes
- MPC AUTO*:
- MPC 3D MOUSE*:
- MODEL 3D MOUSE*:
- B MATRIX 3D MOUSE*:
- SOFT KILL*:
- MPC SINGLE WPTS*:
¶ DVL
- DVL STATUS
- Off
- On
- STOP DVL*: On click, the DVL stops.
*These are clickable buttons.
¶ Adding a new Module
This section explain how to add a new module to and continue to follow the current project architecture.
Please refer to the template created: octopus-telemetry/src/components/TemplateModule.tsx
Steps:
1- Create a new module .tsx file in the components folder: octopus-telemetry/src/components/.
In this example, it is TemplateModule.tsx
2- Add the new component in ModulesMetadata.tsx: octopus-telemetry/src/components/modulepicker/ModulesMetadata.tsx
3- Add the new component in generalContext.tsx: octopus-telemetry/src/context/generalContext.tsx
4- Add the new component in App.tsx: octopus-telemetry/src/App.tsx
¶ Github board
The team used the github board tools to track issues and follow the progress of the projects.
https://github.com/sonia-auv/octopus-telemetry/projects/1
¶ Remains to be done
¶ Remaining features
- Dynamic reconfigure
- Mat plot
- Hydro emulation
- Console
- Manual vision
- Service caller
- Topic Monitor
- Manage bags
¶ Layout manager
A possibility to create different layouts to place module and be able to save/restore has been discussed but remains to be done.
¶ Waypoints/Navigation map
On the previous telemetry the path taken by the submarine was displayed on a map and a position command was available on the map. We are able to clear the waypoints but we cannot see them. This is remain to do.
¶ Alternative solutions
The technology choices in our application were chosen rather quickly - we opted for a React application, using Typescript to have the benefit of fast development with React's API and the relative safety of Typescript.
We could have implemented an application in Dash, knowing that most of the Sonia codebase was already implemented in Python (TODO laurent: link repo here). Dash applications allow to serve a presentation layer in HTML, and uses callbacks to chain events together. Dash effectively allows the development of a full blown we application, without using an API. It blurs the line between the frontend and the backend.
However, due to the nature of the application to be developed, we decided that using a more traditional approach (an API, consumed by a React application served to the client) would be a more robust and scalable approach.
We thought about using Material UI and Vue.js as the frontend framework (instead of React), but decided against it, as the SONIA team seemed more interested in React, which has an large community, very good support and features, and is production-ready.
¶ Presentation video used during PFE
https://www.youtube.com/watch?v=_10IUdKBPy4